Wednesday, February 4, 2009

Pittsburgh Penguins Mittens


I was inspired by some Canadiens mittens I saw on Ravelry, so here's my own version of them, with a Penguins twist. I'm sure you can use your own mitten pattern if you want... this is just a really basic one I have adapted and tend to use all the time.

Yarn: Any worsted weight. I used cheap acrylic from a craft store. Wool would be a LOT nicer though.
Needles: Four No. 4 DPN's

Gauge: approx. 5 stitches per inch (but I didn't really do a swatch to be sure...)


Cast on 36 stitches in black, 12 on each of three DPN's.
Choose the ribbing of your choice (K1,P1; K2,P2; or my favorite, K2,P1) and knit 6 rows


Switch to white. Continue ribbing for two rows

Switch to black. Continue ribbing for one row

Switch to gold. Continue ribbing for three rows
Switch to black. Continue ribbing for one row

Switch to white. Continue ribbing for two rows

Switch to black. Continue ribbing for four rows
Knit 7 rounds
Begin thumb gusset increase:

Left Mitten:

Round one:
needle 1 - k to 2 sts from end, m1, k2
needle 2 - k1, m1, k to end
needle 3 - k across

Round two and all even rounds:
knit all stitches

Round three:
needle 1 - k to 2 sts from end, m1, k2
needle 2 - k2, m1, k to end
needle 3 - k across

Round five:
needle 1 - k to 2 sts from end, m1, k2
needle 2 - k3, m1, k to end
needle 3 - k across

Round seven:
needle 1 - k to 2 sts from end, m1, k2
needle 2 - k4, m1, k to end

needle 3 - k across

Round nine:

needle 1 - k to 2 sts from end, m1, k2
needle 2 - k5, m1, k to end
needle 3 - k across


Round eleven:

needle 1 - k to 2 sts from end, m1, k2
needle 2 - k6, m1, k to end
needle 3 - k across


Round thirteen:

needle 1 - k to last five stitches, place on holder
needle 2 - place first five stitches on holder, k across remaining

needle 3 - k all stitches


At this point, I rearranged my stitches on the needles so the top of the hand was all on one needle. You will need to take 2-3 stitches from EACH of the other two needles to make it even. You will have 19 stitches on this needle, and 9 and 10 on each of the other needles.

BEGIN CHART with white rows.


Stri
pe pattern:
K 2 rows white
K 1 row black
K 10 rows gold

K 1 row black

K 2 rows white

END CHART


Knit 4 rows black, begin decrease rounds

Decrease rounds:

Odd rows:

Needle 1 (Or needle with 19 stitches) - K1, SSK, K to 3 stitches from end, K2tog, K1

Needle 2 - K1, SSK, K remaining stitches

Needle 3 - K to 3 stitches from end, K2tog, K1

Even rows:

K across all stitches


Continue until you have 7 stitches on front and back of mitten. Use the kitchener stitch to graft stitches together.


Thumb:

Divide 10 stitches onto two needles, and pick up four stitches along empty edge. K in round approx. 10-12 rows.
K2tog, repeat until end of round Break yarn, thread through stitches and tie off.


Right Mitten Increases:

Row one:

needle 1 - k across
needle 2 - k to 1 st from end, m1, k1
needle 3 - k2, m1, k to end


Row two and even rows:

K across all stitches


Row three:

needle 1 - k across

needle 2 - k to 2 stitches from end, m1, k1

needle 3 - k2, m1, k to end


Row five:

needle 1 - k across

needle 2 - k to 3 stitches from end, m1, k1

needle 3 - k2, m1, k to end


Row seven:

needle 1 - k across

needle 2 - k to 4 stitches from end, m1, k1

needle 3 - k2, m1, k to end

Row nine:
needle 1 - k across

needle 2 - k to 5 stitches from end, m1, k1

needle 3 - k2, m1, k to end


Row eleven:
needle 1 - k across

needle 2 - k to 6 stitches from end, m1, k1

needle 3 - k2, m1, k to end


Follow pattern for left mitten above


Helpful hints:

-For the first mitten, I broke the yarn between the cuff and palm stripes. After weaving in TOO MANY ENDS, I carried the yarn for the second mitten. It seemed to work great. Just make sure you catch each color every row or two!

-It is your choice if you want to knit the penguin or duplicate stitch it. I did the latter, but kind of wish I knit it with my ever-growing colorwork skills. Just remember you have to carry two colors behind the gold stripe all the way around the mitten.

Friday, January 30, 2009

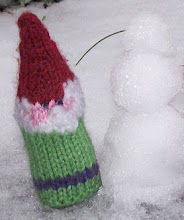
Knitted Pocket Gnome


Knitted Pocket Gnome

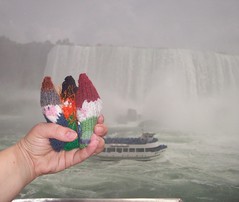
Pocket gnomes are great fun, and easily
made with scrap yarn. Take them on
vacations and other adventures, and
photograph them doing fun things! They are
about four inches tall.


Yarn:
Any scraps of worsted weight yarn. You can make a baby gnome with fingering weight yarn and smaller needles using the same pattern. You will need at least two main colors for the hat, body and belt (you can use a different color for the belt), and a hair and face color. The eyes are done with a Sharpie… just fill in one stitch for each eye.

Needles:
Four (4) double pointed needles. US #3 work great, but anything from a #2-#5 will work depending on the yarn type.

Instructions:
Start the gnome from the top of his hat, working your way down.
With hat color, cast on three stitches on one DPN, Knit one row.
P1, Increase 1, P2
Knit one row

P1, Increase 1, P3
K1, Increase 1, K4
Continue to increase one stitch per row until you have nine stitches. Divide stitches onto three needles. Work in the round, increasing one stitch per needle until each needle has 7 stitches (21 total). Change color to hair color.


Hair and face:
Knit one round in hair color.
K8 hair, K5 face color, K8 hair

K7 hair, K7 face, K7 hair
K8 hair, K5 face color, K8 hair
Change to body color.
K7 body, K7 hair, K7 body
K8 body, K5 hair, K8 body
K9 body, K3 hair, K8 body

K10 body, K1 hair, K8 body
K21 body
Knit five rounds
Change color to belt color
Knit two rounds
Change to body color
Knit three rounds
Purl 1 round (21 stitches, 7 per needle)
[K1, K2tog, K4] x3
[K1, K2tog, K3] x3


At this point, stuff your gnome with the stuffing of your choice, or even more yarn scraps. Continue decreasing one stitch per needle each round until each needle has four stitches (12 total). Break yarn and thread through remaining stitches, pulling tight and tying off.


Comments? Questions? Want to share a picture of your new friend doing something fun?
Email me at jovothegnome@gmail.com

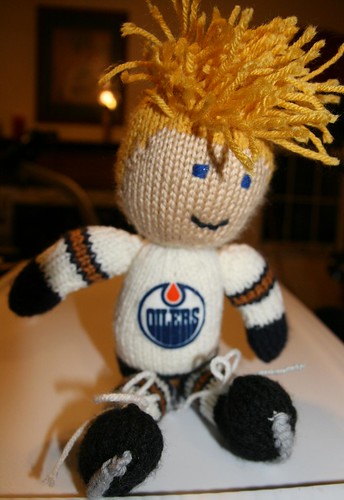
Knitted Hockey Player


Worsted weight yarn, No. 5 DPN's (3.25 mm)


What will make your hockey player your own unique creation are the colors and striping patterns you use to personalize your toy to match that of your favorite team. It uses very little yarn, so scraps are perfect, but color choice was important to make my guy match the colors and uniform of the Edmonton Oilers. I found a small Oilers patch on Ebay for the final touch on his sweater, but each toy should be customized individually with different hair styles, colors and stripes on their socks and sweaters.


Legs (make two)

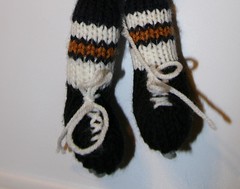
Cast on 12 stitches for the skate (black)
Knit one round
K1, [m1, k1] to end. (23 stitches)
Knit one round
K1, m1, k8, [m1, k1] 6 times, k7, m1, k1. (31 stitches)
Knit three rounds

K13, k2tog, k1, skp, k13
Knit one round
K12, k2tog, k1, skp, k12
Knit one round
K7, bind off next 13 stitches, k to end

Work one round (finish skate color)
Switch yarn to sock color
Work approx. 16 rows across all 14 stitches, changing colors for your stripes and pant legs. Mine was: 4 rounds of white, one blue, two copper, one blue, three white, then color of pants

K1, k2tog, k1, skp, k2, k2tog, k1, skp, k1 (10 stitches)
Knit one round
Bind off


Finishing notes for leg and skate:
-Where you cast off becomes the top of the skate
-Sew up the bottom of the foot and the top of the skate where
you cast-off in the middle of a round

-Use white yarn and stitch it into the skate in a shoelace pattern, leaving the ends with spare to tie into a bow

-The skate blade was created by chain crocheting 8 stitches of doubled over grey worsted weight yarn and stitching this short chain to the bottom of the foot


Body


Cast on 15 stitches on 3 needles
Knit one round
K1 [k1, m1] to end. (29 stitches)
Work five rounds
[K7, m1] twice, k1 [m1, k7] twice. (33 stitches)
Work 3 rounds
K16, m1, k1, k16
Work 17 rounds (Do 10 rounds, then start a stripe pattern)
K15, skp, k1, k2tog, k15
Work 3 rounds
K14, skp, k1, k2tog, k14 (31 stitches)
Knit 1 round

Bind off

Arms (make two)

Cast on 6 stitches
Knit one round
K1, [m1, k1] to end (11 stitches)
Knit one round
K1, [m1, k4, m1, k1] twice (15 stitches)
Work 5 rows, change color to 4-row stripe pattern
Work stripe pattern
K1 [skp, k2, k2tog, k1] twice (11 stitches)

Work 3 rounds
Inc one st at each end of next row (13 stitches)
Change to glove color
Work 5 rounds
K1 [skp, k1, k2tog, k1] twice (9 stitches)
Work one round
K1, [k2tog] to end (5 stitches)
Break yarn, thread through remaining stitches, pull up and fasten off securely


Head

With flesh color yarn, cast on 13 stitches
Knit 1 round
K1, [m1, k1} to end (25 stitches)

Knit 1 round
K1, [m1, k2] to end (37 stitches)
Knit 3 rounds
[K9, m1] twice, k1, [m1, k9] twice. (41 stitches)
Knit one round
*start hair by knitting 10 stitches of hair color, then flesh, then final 10 stitches of hair*

*Each round for 4 rounds, make the hair one stitch longer on each side*
K20, m1, k1, m1, k20. (43 stitches)
Work 10 rounds in this flesh/hair pattern
[K8, skp] twice, k3, [k2tog, k8] twice (39 stitches)
Work one round Use only the hair color for this round and remaining rounds

[K7, skp] twice, k3, [k2tog, k7] twice (35 stitches)

Work one round

[K6, skp] twice, k3, [k2tog, k6] twice (31 stitches)

Work three rounds

K1, [k2tog, k1] to end (21 stitches)

Work one round

K1, [k2tog] to end (11 stitches)

K1, [k2tog] to end (6 stitches)

Break off yarn, thread through remaining stitches, pull up tightly and fasten off securely.


Finishing Notes for your Hockey Doll

-Stuff pieces and seam them up, stitching body parts together.

-Using the embroidery stitch of your choice, add eyes and a mouth to the face

-For the hair, I improvised, threading it through my stitches and tying off clumps. I tried to make the hair similar to a favorite player.

-The finishing of the doll is the most creative part. Have fun with it!

Feel free to message me on ravelry or email me if you have any questions I can help you with! This is my first attempt at a pattern, but hopefully it’s useful!